MapServer uses MapFile(.map) to configure map service. Since MapFile structure is pretty complicated, it is easier to use a GUI tool. I use QGIS and the RT MapServer Exporter plugin.
To install RT MapServer Exporter plugin for QGIS, follow the procedure,
- Open QGIS (I assume QGIS is successfully installed). If you don’t have QGIS installed, I suggest install it through OSGeo4W. At ‘Select Pakages’, select both Desktop—>QGIS and Web—>mapscript-python.
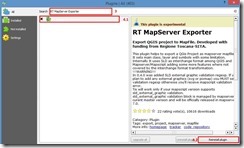
- On the Menu bar, click Plugins —> Manage and Install Plugins. The plugins window would appear.
- In the search box, type in ‘RT MapServer Exporter’. RT MapServer Exporter would appear in the result window.
- Check the checkbox in front of the plugin then click ‘Install Plugin’ button at the right bottom corner. See attached screen shot (The screen shot shows ‘Reinstall plugin’, if you never installed the plugin, it would show ‘Install Plugin’.).

Then just create a map in QGIS and add some shapefiles. The shapefiles are better to be stored in the same folder.
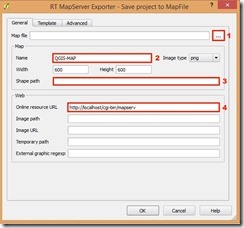
If you are happy with the map you create in QGIS and ready to export it to a MapFile. Just click Web –> RT MapServer Exporter –> Export project to mapfile. The SaveProjectToMapFile window would appear.
- Browse to where you want to save your MapFile.
- Give the map a name.
- The path to the shapefile folder on server.
- Replace localhost to your server name. Remember on windows server, ‘mapserv’ must be replaced by ‘mapserv.exe’.
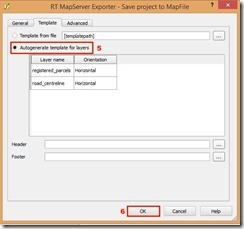
- Click the Template Tab on top of the window, select ‘Autogenerate template for layers’.
- Click OK to save the MapFile.
- Create a folder under “C:\ms4w\apps” on the server. Please refer to my last post regarding MapServer Installation on Windows.
- Copy both the MapFile (.map) and template file (.tmpl) to the folder.
- Copy the shapefile folder to the server. Remember to use exactly the same path as your input at step 3 above.
- Open the MapFile on Server, Find ‘TEMPLATE’ and replace its value to the path of the template file (.tmpl) on the server.
- Locate METADATA in WEB Object. Add the following line between METADATA and END.
"wms_enable_request" "*"
- Update data source. Locate DATA in LAYER Object. Change the data value to the shapefile path on the server.
- Locate FONSET in MAP Object. Comment out this line (add # sign in the front of the line).
- Use the following url format to access WMS service of a map.
http://{server-name}/cgi-bin/mapserv.exe?MAP={map path on server}Say if your server is called mpserver and your map file path on the server is “C:\ms4w\app\test\test.map”. The url to this map is,
http://mpserver/cgi-bin/mapserv.exe?MAP=C:/ms4w/app/test/test.map
Lessons Learnt from publishing the first WMS Services while using shapefiles as data source.
- RT MapServer Exporter (Ver. 0.4.0) exports layers in QGIS layer order. QGIS renders layers from bottom to top, however MapServer renders layer in the opposite way. So manually reverse layer order is necessary.
- RT MapServer Exporter does not export layer label settings.
- If SHAPEPATH is defined in MapFile, it is OK to use relative path to shapefile data.
- If there is no label used, remove the ‘FONTSET’ line.
Please refer to official MapFile documentation to further adjust your MapFile.

